Search in shivacherukuri.tech@blogger.com

Wednesday, November 23, 2011

what is a tail recursion?

             A function call is said to be tail recursive if there is
nothing to do after the function returns except return its value.
Since the current recursive instance is done executing at that point,
saving its stack frame is a waste. Specifically, creating a new stack
frame on top of the current, finished, frame is a waste. A compiler is
said to implement TailRecursion if it recognizes this case and
replaces the caller in place with the callee, so that instead of
nesting the stack deeper, the current stack frame is reused. This is
equivalent in effect to a "GoTo", and lets a programmer write
recursive definitions without worrying about space inefficiency (from
this cause) during execution. TailRecursion is then as efficient as
iteration normally is.
The term TailCallOptimization is sometimes used to describe the
generalization of this transformation to non-recursive TailCall?s. The
best-known example of a language that does this is the SchemeLanguage,
which is required to support ProperTailCalls. Recursion is the basic
iteration mechanism in Scheme.

Consider this recursive definition of the factorial function in C:

factorial(n) {
if (n == 0) return 1;
return n * factorial(n - 1);
}


This definition is not tail-recursive since the recursive call to
factorial is not the last thing in the function (its result has to be
multiplied by n). But watch this:

factorial1(n, accumulator) {
if (n == 0) return accumulator;
return factorial1(n - 1, n * accumulator);
}


factorial(n) {
return factorial1(n, 1);
}


The tail-recursion of factorial1 can be equivalently defined in terms of goto:

factorial1(n, accumulator) {
beginning:
if (n == 0) return accumulator;
else {
accumulator *= n;
n -= 1;
goto beginning;
}
}


From the goto version, we can derive a version that uses C's built-in
control structures:

factorial1(n, accumulator) {
while (n != 0) {
accumulator *= n;
n -= 1;
}
return accumulator;
}


And Perl

sub factorial {
my $arg;
$arg == 0 ? 1 : $arg * factorial($arg - 1);
}

Reverse Code Engineering and basics of assembly language

CPU Registers

A processor takes data and instructions that are stored in memory and performs whatever calculations are required, then writes the output back into memory as applicable. However, the CPU needs a place to store the data it retrieves from memory while it calculates; this is where the registers come in. Registers are small segments of memory inside the CPU that are used for temporarily storing data; some have specific functions, others are just used for general data storage. In a 32-bit processor, each register can hold 32 bits of data; in a 64-bit processor, the registers can hold 64 bits of data. This paper will assume the classic 32-bit registers are being used, but even if you have a 64-bit CPU, as long as it is backwards compatible with 32-bit applications, all of the following information is still applicable.

There are many registers used by a processor, but we are concerned primarily with a group of registers called the general purpose registers. The general purpose registers are composed of:


EAX
EBX
ECX
EDX
ESI
EDI
ESP
EBP
EIP

The EAX register is called the accumulator, and is commonly used to hold the results of a calculation. If a function returns a value, this value will be placed in the EAX register so that the code that called the function can access the return value.

EBX is a pointer to the data segment, and ECX is normally used to count the number of iterations in a loop; EDX is used as an I/O pointer. It is important to note that while these are the suggested functions of the EAX, EBX, ECX and EDX registers, they are not restricted to these uses, with a few exceptions. For example, EAX can be used to hold data regardless of whether or not that data is the result of some calculation; however, if a function returns a value, that value will always be stored in the EAX register.

ESI and EDI are used to specify source and destination addresses respectively; they are most often used when copying strings from one memory address to another.


ESP is a stack register, called a stack pointer, that points to the top of the stack; EBP is also a stack register (called the base pointer), used to reference local variables and function arguments on the stack. The exact purpose and usage of the ESP and EBP registers will be clarified in the following sections.

EIP is the instruction pointer register - it controls program execution by pointing to the address of the next instruction to be executed. For example, if your program calls a function that is located at the address of 0x08ffff1d, the value stored in EIP will be changed to that address so that the CPU knows where to go in order to execute the first instruction of that function. Note that there is no way to directly control the value stored in EIP.


The 'E' at the beginning of each register name stands for Extended. When a register is referred to by its extended name, it indicates that all 32 bits of the register are being addressed.  An interesting thing about registers is that they can be broken down into smaller subsets of themselves; the first sixteen bits of each register can be referenced by simply removing the 'E' from the name. For instance, if you wanted to only manipulate the first sixteen bits of the EAX register, you would refer to it as the AX register. Additionally, registers AX through DX can be further broken down into two eight bit parts. So, if you wanted to manipulate only the first eight bits (bits 0-7) of the AX register, you would refer to the register as AL; if you wanted to manipulate the last eight bits (bits 8-15) of the AX register, you would refer to the register as AH ('L' standing for Low and 'H' standing for High).
 

Process Memory and the Stack

Often, a process will need to deal with more data than there are available registers. To remedy this, each process running in memory has what is referred to as a stack. The stack is simply an area of memory which the process uses to store data such as local variables, command line/function arguments, and return addresses. Before examining the stack in detail, let's take a look at how a process is generally arranged in memory:
 

High Memory Addresses (0xFFFFFFFF)
---------------------- <-----Bottom of the stack
|                     |
|                     |   |
|         Stack       |   | Stack grows down
|                     |   v
|                     |
|---------------------| <----Top of the stack (ESP points here)
|                     |
|                     |
|                     |
|                     |
|                     |
|---------------------|  <----Top of the heap
|                     |
|                     |    ^
|       Heap          |    | Heap grows up
|                     |    |
|                     |
|---------------------| <-----Bottom of the heap
|                     |
|    Instructions     |
|                     |
|                     |
-----------------------
Low Memory Addresses (0x00000000)


As you can see, there are three main sections of memory:

1. Stack Section - Where the stack is located, stores local variables and function arguments.

2. Data Section - Where the heap is located, stores static and dynamic variables.

3. Code Section - Where the actual program instructions are located.

The stack section starts at the high memory addresses and grows downwards, towards the lower memory addresses; conversely, the data section (heap) starts at the lower memory addresses and grows upwards, towards the high memory addresses. Therefore, the stack and the heap grow
towards each other as more variables are placed in each of those sections.

Essential Assembly Instructions

Instruction Example          Explanation
push push eax Pushes the value stored in EAX onto the stack
pop pop eax Pops a value off of the stack and stores it in EAX
call call 0x08ffff01 Calls a function located at 0x08ffff01
mov mov eax,0x1 Moves the value of 1 into the EAX register
sub sub eax,0x1 Subtracts 1 from the value in the EAX register
add add eax,0x1 Adds 1 to the value in the EAX register
inc inc eax Increases the value stored in EAX by one
dec dec eax Decreases the value stored in EAX by one
cmp cmp eax,edx Compare values in EAX and EDX; if equal set the zero flag* to 1
test test eax,edx Performs an AND operation on the values in EAX and EDX; if the result is zero, sets the zero flag to 1
jmp jmp 0x08ffff01 Jump to the instruction located at 0x08ffff01
jnz jnz 0x08ffff01 Jump if the zero flag is set to 1
jne jne 0x08ffff01 Jump to 0x08ffff01 if a comparison is not equal
and and eax,ebx Performs a bitwise AND operation on the values stored in EAX and EBX; the result is saved in EAX
or or eax,ebx Performs a bitwise OR operation on the values stored in EAX and EBX; the result is saved in EAX
xor xor eax,eax Performs a bitwise XOR operation on the values stored in EAX and EBX; the result is saved in EAX
leave leave Remove data from the stack before returning
ret ret Return to a parent function
nop nop No operation (a 'do nothing' instruction)

*The zero flag (ZF) is a 1 bit indicator which records the result of a cmp or test instruction

Each instruction performs one specific task, and can deal directly with registers, memory addresses, and the contents thereof. It is easiest to understand exactly what these functions are used for when seen in the context of a simple hello world program, which we will do a little bit later.

Assembly syntax

There are two types of syntax used in assembly code: Intel and AT&T.  Each display thesame instructions, just a little bit differently (in the above examples I have used Intel syntax).  The primary difference is that the source and destination operands are flip-flopped. Look at the differences in how the syntaxes display the instruction to move the number 1 into the EAX register:

Intel Syntax: mov eax, 0x1

AT&T Syntax: mov $0x1,%eax

Besides the source (the number 1) and the destination (the EAX register) being reversed, the AT&T syntax also adds a percent sign in front of all register names and a dollar sign in front of hexadecimal numbers. Regardless of syntax however, it is still the same instruction.

You should be familiar with both syntaxes, as different disassemblers may use either one
or the other syntax when disassembling a program. For my following examples I will be using the Intel syntax since it is a little easier to understand; however, the GNU debugger (gdb), which we will be using later in this paper, uses AT&T syntax. As such, I will be supplying both the AT&T and Intel versions of the sample programs in order to give exposure to both syntaxes. For more information on the differences between AT&T and Intel syntaxes, see the gnu.org link in the references section at the end of this paper.


The Stack in Detail

The stack is a Last In, First Out (LIFO) data structure. Imagine that you are stacking plates; the first plate you put on the stack will be on the bottom; the second plate will be on top of the first plate, and the third plate will be on top of the second. When you start taking plates off of the stack, the third plate will come off first, then the second, and finally, the first. The stack section in memory operates the same way: data can be placed on the stack, but if you place three pieces of data on the stack, you will first have to remove the last two in order to access the first piece of data.

There are two types of stack operations: push and pop. When you want to place data onto the stack, you "push" it; when you want to remove data from the stack, you "pop" it. So, if you push the numbers 1, 2 and 3 in order onto the stack, when you pop the stack, you will get the number three; pop it again, and you will get the number two; pop it a third time and you will get the number one. To help visualize this, after pushing the numbers, the stack would look like:


-----------
|   1     |
-----------
|   2     |
-----------
|   3     |
----------- <---ESP

If we then pop the stack, it will look like:

-----------
|   1     |
-----------
|   2     |
----------- <---ESP

If we push the number 4 onto the top of the stack, it will look like:

-----------
|   1     |
-----------
|   2     |
-----------
|   4     |
----------- <---ESP

Don't be confused by the arrangement of the "top" and "bottom" of the stack; remember that the stack grows downwards, so data at the bottom of the stack (in this case, the number 1) is actually at the highest memory address, and the top of the stack (the number 4) is at a lower memory address. This is analogous to stacking plates on the ceiling.

Recall that the ESP register always points to the top of the stack. This means that whenever you
push data onto the stack, the address stored in ESP is decremented by the number of bytes placed onto the stack; when you pop the stack, ESP is incremented by the number of bytes removed from the stack.

Function Arguments and Local Variables
 

The stack is used to store a function's arguments and local variables; to understand how assembly instructions reference these variables, let's see how that data is arranged on the stack. Take a look at the following function and what the resulting stack layout would be:

int myFunction(int var1, int var2, int var3)
{
    char buffer1;
    char buffer2;
    char buffer3;
}

----------------------- <-----Bottom of the stack (top of memory)
|    var3             |
|---------------------|
|    var2             |
|---------------------|
|    var1             |
|---------------------|
|    Return Address   |
|---------------------|
|    Saved EBP Value  |
|---------------------| <----EBP Points here
|    buffer1          |
|---------------------|
|    buffer2          |
|---------------------|
|    buffer3          |
----------------------- <----ESP (top of the stack,                               low memory addresses)

For the moment, we will ignore the return address and saved EBP value, and concentrate on how the arguments and variables get placed onto the stack. Before a function is called, all of its arguments must first be placed on the stack. These arguments are pushed onto the stack in reverse order; that is, in our example, var3 would be pushed first, var2 second, and finally var1:

push var3
push var2
push var1
call myFunction

The call instruction will automatically place the return value onto the stack, and the saved EBP value is pushed immediately afterwards by myFunction (again, we are ignoring these values for now - more on them later). Then, the local variables are pushed onto the stack in the order which they are declared;  first buffer1, then buffer2, and lastly buffer3. When you look at the assembly code of a disassembled program however, you won't have nice names for variables like var1 or buffer1; instead they will be indicated by memory addresses, or as offsets from EBP (recall that the purpose of EBP is to reference variables on the stack). Since the function arguments are located at higher memory addresses than the address pointed to by EBP, they will be referenced as positive offsets from EBP (example: 'ebp+8'); local variables, being located at lower memory addresses, will be referenced as negative offsets from EBP (example: 'ebp-4'). So, whenever you see something referenced as an offset from EBP, you know that you are dealing with a local variable.

Return Addresses and the Prologue


Besides storing data and function arguments, the stack is also used for storing critical values when calling functions. Recall that the EIP always points to the next instruction to be executed; however, the EIP has no way of storing old instruction addresses, so when a function returns, the EIP needs a way to determine where to return to. Whenever a function is called, the memory address of the next instruction in the calling function is pushed onto the stack. When the called function finishes, this address is popped off the stack and placed into the EIP register so that the CPU can return to the next instruction in the calling function. Take the following pseudocode as an example:
 

functiona()
    var x = 1
    call functionb()
    x=0
return

When functiona calls functionb, the memory address that contains the 'x=0' assignment is pushed onto the stack. When functionb finishes, that address is popped off the stack and placed into the EIP, so the processor then knows that the next instruction it has to perform is to set the variable x equal to zero.

In addition, the value of the EBP register needs to be saved and appropriately changed when a
new function is called, such as in our above example. By now you may be wondering why the EBP is used at all; why not just reference variables from the stack pointer? The base pointer is used because as data is added to and removed from the stack, the position of the stack pointer (ESP) will be constantly changing, making it difficult to use it as a reference point for locating stack variables. However, it is impractical to use the same EBP value for every function, especially in more complex programs where you have functions inside of functions inside of functions, ad infinitum. But, just like the EIP, when a function finishes and returns control to its parent function, that parent function will need to have its original EBP value restored into the EBP register so that it can continue to reference its own variables and arguments. And, just like the EIP value, the calling function's EBP value is also placed on the stack.


However, the EBP value is not pushed onto the stack automatically; this job is up to the child
function, and the process of doing so is called the prologue. Basically what the prologue does is save the parent function's EBP value onto the stack, then gives the child function its own EBP value.  Finally, the prologue allocates enough room on the stack to hold all of the local variables. The resulting
  assembly code looks like this:

push ebp
mov ebp, esp
sub esp, 0x24

Let's take this one line at a time, shall we. The first instruction is very simple; it pushes the value in EBP (i.e., the EBP value of the calling function) onto the stack. The second instruction copies the value in ESP into the EBP register (thus giving the child function its own EBP value). Finally, the third instruction decrements the stack pointer by 36 bytes (0x24 in hexadecimal); the actual value that is subtracted from ESP will of course depend on the size and number of local variables present in the function. But what is the second instruction really doing? Why copy the stack pointer value into EBP?  To see why, look again at our sample stack layout; note the steps that have been added, and which parts of the stack are affected by them. Make particular note of where the EBP value is pointing to as well:

        ----------------------- <--Bottom of the stack (top of memory)
        |        var3         |
        |---------------------|
        |        var2         | Step 1: Arguments pushed onto the stack.
        |---------------------|
        |        var1         |
        |---------------------|
        |    Return Address   | Step 2 The call instruction pushes the return address onto the stack.

        |---------------------| 
        | Saved EBP Value     | Step 3: The prologue saves the EBP value onto the stack.
EBP --> |---------------------| 
        |        buffer1      | Step 4: The prologue allocates space on the stack for local variables by decrementing the value of ESP.
        |---------------------|
        |        buffer2      | 
        |---------------------|
        |        buffer3      |
        ----------------------- <----ESP (top of the low memory addresses)


However, when the second instruction (mov ebp, esp) is executed, only steps one through three have been performed - no space has been allocated on the stack for local variables yet. So when the ESP value is copied into the EBP register, the stack actually looks like this:

        ----------------------- <-----Bottom of the stack (top of memory)
        |        var3         |
        |---------------------|
        |        var2         |
        |---------------------|
        |        var1         |
        |---------------------|
        | Return Address      |
        |---------------------|
        | Saved EBP Value     |
        ----------------------- <----ESP (top of the stack, low memory addresses)

Note that ESP is pointing exactly where the EBP needs to be. This makes setting the new EBP value simple; before allocating space for the local variables (step four), simply copy the value of ESP into
EBP.

Some Minor Details...

The above examples have been portrayed as layouts of the program's stack; in reality, they are really just sections of the stack known as stack frames. Since each function has its own arguments and variables, each function has its own frame. A function will clean up its frame before returning, but if you have functions called inside of other functions, you will have multiple frames on the stack. For instance, if functiona() calls functionb() which calls functionc(), an overall view of that program's stack would look like:


        ----------------------- <-----Bottom of the stack (top of memory)
        | functiona() Frame   |
        |---------------------|
        | functionb() Frame   |
        |---------------------|
        | functionc() Frame   |
        ----------------------- <----Top of the stack (low memory addresses)


Reverse Engineering a Program

In this last section, we will be writing a simple hello world program in C, compiling it, then analyzing the disassembled binary. The code will be compiled with gcc and disassembled using gdb; if you are using Windows, you can get Dev-C++ from bloodshed.net which is a nice IDE that comes with all the gcc utilities, including gdb. Bear in mind that if you compile the source code yourself, your assembly code may be slightly different from mine due to variations in the different versions of gcc (I am using gcc v3.3.5 on Linux and v3.4.2 on Windows - they both produce identical assembly instructions). Also, your memory addresses probably won't match mine, but this is normal as they will  be different when compiled on different systems. Finally, we will examine the disassembly of a slightly more complex program and walk through reverse engineering it.

Using GDB

As stated earlier, gdb is both a debugger and a disassembler. In the following examples, we will be using gdb as a disassembler to perform a static analysis of our code. Gdb has many commands, but for our purposes there are just a few we will be using:


Command Example Explanation
file file helloworld Open the specified program in gdb. The program name can also be specified on the command line when starting gdb ($gdb helloworld).
disassemble  disassemble main Disassemble the specified function in the program.Gdb will display the function's assembly instructions on screen.
x x/20s 0x80403001 Examine the contents of 20 addresses as strings starting at memory address 0x80403001. If you want to view the contents in hexadecimal, replace the 's' with an 'x'.


Hello World

We will first use gdb to analyze a binary compiled from the following source code:


int main(int argc, char *argv[])
{
printf("Hello World!\n");
return 0;
}

Save this program as helloworld.c and compile it with 'gcc -o helloworld helloworld.c'; run the resulting binary and it should print "Hello World!" on the screen and exit. So far so good, now let's take a look at the assembly code:

heff@TPad:~/Programming$ gdb helloworld
GNU gdb 6.3-debian
Copyright 2004 Free Software Foundation, Inc.
GDB is free software, covered by the GNU General Public License, and you are
welcome to change it and/or distribute copies of it under certain conditions.
Type "show copying" to see the conditions.
There is absolutely no warranty for GDB. Type "show warranty" for details.
This GDB was configured as "i386-linux"...Using host libthread_db library "/lib/libthread_db.so.1".
(gdb) disassemble main
Dump of assembler code for function main:
0x08048384 <main+0>: push %ebp
0x08048385 <main+1>: mov %esp,%ebp
0x08048387 <main+3>: sub $0x8,%esp
0x0804838a <main+6>: and $0xfffffff0,%esp
0x0804838d <main+9>: mov $0x0,%eax
0x08048392 <main+14>: sub %eax,%esp
0x08048394 <main+16>: movl $0x80484c4,(%esp)
0x0804839b <main+23>: call 0x80482b0 <_init+56>
0x080483a0 <main+28>: mov $0x0,%eax
0x080483a5 <main+33>: leave
0x080483a6 <main+34>: ret
End of assembler dump.

Let's look at each instruction, keeping in mind that this disassembly is in the AT&T syntax (source on the left, destination on the right):

0x08048384 <main+0>: push %ebp
0x08048385 <main+1>: mov %esp,%ebp
0x08048387 <main+3>: sub $0x8,%esp

These three instructions should be familiar; they are the function's prologue. The ' push %ebp' instruction saves the current EBP value onto the stack; ' mov %esp,%ebp' creates the new EBP value by copying ESP into EBP; then eight bytes of space is created on the stack for local variables using the 'sub $0x8,%esp' instruction.

0x0804838a <main+6>: and $0xfffffff0,%esp
0x0804838d <main+9>: mov $0x0,%eax
0x08048392 <main+14>: sub %eax,%esp


These three instructions are used to clean up any stray bits and prepare ESP and the stack at the beginning of the program; they are present only in a program's main() function, but not any subsequent functions. The first command zeros out the last byte of the value in ESP; the next two commands put the value 0 into the EAX register, then subtracts the EAX register (aka, zero) from the stack pointer.

0x08048394 <main+16>: movl $0x80484c4,(%esp)

This instruction places the memory address 0x080484c4 onto the stack - the compiler just chose to use a different way of placing the memory address onto the stack than the standard push instruction. Note the parenthesis around %esp - this indicates a pointer. So, the mov command (AT&T syntax always uses 'movl' instead of 'mov', but they are the same instructions) is actually placing the memory address into the address pointed to by the ESP register, not directly into the ESP register itself. Perhaps you noticed that in the prologue, eight bytes were reserved on the stack for local variables, even though no variables are defined in our source code. That was necessary in order to place the memory address on the stack in this manner. If those eight bytes had not been allocated, ESP would still be pointing to the same place as EBP, and the saved EBP value would be been overwritten with the 0x080484c4 address (why the compiler uses this instead of a push instruction I don't know - that's up to the gcc developers  :).

0x0804839b <main+23>: call 0x80482b0 <_init+56>

This is a call to a function at the address 0x08482b0. Since we have only one function that is called from our code, this must be the call to printf(). There was a push instruction (or the equivalent thereof) immediately before calling printf(), so that push must have placed an argument for printf() onto the stack. Our call to printf() only has one argument: the string to print. This can be double checked by examining the contents of 0x080484c4 (the address pushed onto the stack) by issuing the command:

(gdb)x/s 0x08048384
0x8048384 <_IO_stdin_used+4>: "Hello World!\n"
(gdb)

So, this is indeed our call to printf(), and our single argument, the "Hello World!\n" string, wasappropriately placed on the stack just before it was called.

0x080483a0 <main+28>: mov $0x0,%eax

Remember that the EAX register holds any value that is returned by a function, and our main() function returns zero. So this instruction is placing the value 0 into EAX in preparation for a return.

0x080483a5 <main+33>: leave

The leave instruction cleans up the stack by removing all local variables from the stack and popping the saved EBP value off the stack into the EBP register, restoring it to its original value.

0x080483a6 <main+34>: ret

The ret instruction pops the top value off of the stack and places it into the EIP register. Since all data through he saved EBP value has been removed by the leave instruction, the top most piece of data on the stack is the saved EIP value; thus, the leave and ret instructions enable the function to properly return. Since these last three instructions (main+28 through main+34) prepare the function to return and clean up data placed on the stack by the prologue, they are known as the function's epilogue.

Here is the same disassembly, but this time printed in the Intel syntax, and commented for an easier feel of how the program flows:


0x8048384 push ebp <--- Save the EBP value on the stack
0x8048385 mov ebp,esp <--- Create a new EBP value for this function
0x8048387 sub esp,0x8 <---Allocate 8 bytes on the stack for local variables
0x804838a and esp,0xfffffff0 <---Clear the last byte of the ESP register
0x804838d mov eax,0x0 <---Place a zero in the EAX register
0x8048392 sub esp,eax <---Subtract EAX (0) from the value in ESP
0x8048394 mov DWORD PTR [esp],0x80484c4 <---Place our argument for the printf() (at address 0x08048384) onto the stack
0x804839b call 0x80482b0 <_init+56> <---Call printf()
0x80483a0 mov eax,0x0 <---Put our return value (0) into EAX
0x80483a5 leave <---Clean up the local variables and restore the EBP value
0x80483a6 ret <---Pop the saved EIP value back into the EIP register

As you can see, they are all the same instructions, just formatted a little differently; note also how the Intel syntax indicates a pointer reference as opposed to the AT&T syntax.

Disassembling Without The Source

Next, we will examine a program for which we have no source code, called helloworld2. We will attempt to reconstruct the original source code as closely as possible, and to understand how the
program operates. Let's start out by running the program to see what it does:

$./helloworld2
Hello World!
$

So far, it appears no different than our first program. We know that it prints out a string to stdout, so it probably uses the printf() function. If we are disassembling this in Linux, we can use the strings command to look for the "Hello World!" string and anything else that may be interesting:

$strings helloworld2
/lib/ld-linux.so.2
_Jv_RegisterClasses
__gmon_start__
libc.so.6
printf
_IO_stdin_used
__libc_start_main
GLIBC_2.0
PTRh@
[^_]
Hello World!
Goodbye World!

We see our "Hello World!" string, but there is also a "printf" string (indicating that the program does indeed use printf), and another interesting string, "Goodbye World!". Now, let's look at the main() function in gdb:

(gdb) disassemble main
Dump of assembler code for function main:
0x080483af <main+0>: push %ebp
0x080483b0 <main+1>: mov %esp,%ebp
0x080483b2 <main+3>: sub $0x8,%esp
0x080483b5 <main+6>: and $0xfffffff0,%esp
0x080483b8 <main+9>: mov $0x0,%eax
0x080483bd <main+14>: sub %eax,%esp
0x080483bf <main+16>: movl $0x1,0x804961c
0x080483c9 <main+26>: call 0x8048384 <myprint>
0x080483ce <main+31>: mov $0x0,%eax
0x080483d3 <main+36>: leave
0x080483d4 <main+37>: ret

Here we see the same prologue as before between main+0 and main+14. However, at main+16 we see that the number 1 is being moved into the memory address at 0x0804961c. This memory address is referenced directly, not as an offset from EBP, indicating that it is a global, not local, variable. Since the number 1 is being moved into it, it is safe to assume that this is an integer variable as well; we will call it var1. Next is a call to a function named 'myprint', which takes no arguments. Immediately afterwards we see the epilogue where 0 is moved into EAX, and leave and ret are called. So we now know that the main function simply sets a global integer variable to 1, calls a second function, then returns zero. We can reconstruct the main() function's source code to read:

int var1; /* The global integer variable */

int main()

{
    var1 = 1;
    myprint();
    return 0;
}

Next, let's examine the myprint() function:

(gdb) disassemble myprint
Dump of assembler code for function myprint:
0x08048384 <myprint+0>: push %ebp
0x08048385 <myprint+1>: mov %esp,%ebp
0x08048387 <myprint+3>: sub $0x8,%esp
0x0804838a <myprint+6>: cmpl $0x1,0x804961c
0x08048391 <myprint+13>:jne 0x80483a1 <myprint+29>
0x08048393 <myprint+15>:movl $0x80484f4,(%esp)
0x0804839a <myprint+22>:call 0x80482b0 <_init+56>
0x0804839f <myprint+27>:jmp 0x80483ad <myprint+41>
0x080483a1 <myprint+29>:movl $0x8048502,(%esp)
0x080483a8 <myprint+36>:call 0x80482b0 <_init+56>
0x080483ad <myprint+41>:leave
0x080483ae <myprint+42>:ret

We see that after the prologue, at myprint+6, there is a comparison operation. It is comparing the value stored in 0x0804961c (var1, the global variable we saw in the main() function) with the number 1. Immediately afterwards is a jne instruction. So, if var1 is not equal to 1, the the program will jump down to myprint+29, but if it is equal to 1 (which we know it is, because it was set to 1 in the main() function), it will execute the next instruction at myprint+15. Since we know that the jump will not be taken, let's look at what happens at myprint+15.

Myprint+15 pushes the memory address of 0x080484f4 onto the stack (again, using the mov instruction instead of push, but achieving the same end result), then calls a function that is located at 0x080482b0. This means that the function at 0x080482b0 is passed one argument; let's take a look at what that argument is by examining what is stored at the address 0x080484f4:

(gdb)x/s 0x080484f4
0x80484f4 <_IO_stdin_used+4>: "Hello World!\n"

This is our "Hello World!" string, and since we know that printf() is being used to print it to stdout, then the function at 0x080482b0 must be printf(). After the call to printf(), the program jumps down to myprint+41, which begins the function's epilogue. Since no value is placed in EAX before returning, and we know that the main() function does not examine EAX or place it anywhere in memory after calling the myprint() function, we can surmise that this function doesn't return a value.

But let's now look at what would happen if var1, for some reason, did not equal one. The jne instruction specifies that the program would jump down to myprint+29, which places a memory address (0x08048502) onto the stack in the same manner as before, then calls a function at 0x080482b0 - the printf() function. This means that either way printf() is called, it is just provided with a different argument. Taking a look at the contents of 0x08048502, we see that this alternate argument is the "Goodbye World!" string that we saw with the strings command earlier:


(gdb)x/s 0x08048502
0x08048502 <_IO_stdin_used+18>:"Goodbye World!\n"

We now know enough about the myprint() function to reconstruct its original source code as well:

void myprint()
{
    if(var1 == 1){
        printf("Hello World!\n");
    } else {
        printf("Goodbye World!\n");
    }
}

While there is no real purpose of the if-else statement (since var1 will always be equal to zero), I wanted to include it in order to show what a conditional statement looked like in assembly code. It is very important that you are able to recognize and understand conditional statements in assembly, as more complex comparisons (such as long case/switch statements) will be more difficult to follow.

Sunday, September 18, 2011

IPv4 addressing

Introduction


This section looks at IP addressing, subnet masking, Private and Special addresses. Examples are provided to illustrate the methodology when setting up an IP network addressing scheme. We also look at Wildcard masks and Directed Broadcasts.

IP Address Classes


Unique IP (Internet Protocol) addresses are assigned to each physical connection of a device to a network, therefore if a device (host) has more than one connection to a network or networks, then it will have more than one IP address.

An IP address is represented as four decimal integers, with each integer corresponding to one byte this means an IP address is 32 bits long as per the following example:-
162.            146.            93.             14            
dotted decimal 10100010. 10010010. 01011101. 00001110
binary
IP addresses are divided into two parts, a Network ID and a Host ID each of which can be of varying bit lengths but always making 32 bits altogether.

Hint:- Use the Windows calculator to convert binary to decimal and vice versa.

There are five primary classes of IP addresses and it is the high order 3 bits of the address which identify the class as shown below:-
                        First Octet         Example Network      
Host Class A 0xxxxxxx 1-127 25.234.45.0 1
Class B 10xxxxxx 128-191 140.250.43.0 1
Class C 110xxxxx 192-223 192.2.3.0 1
Class D 1110xxxx 224-239 232.56.4.0 1
Class E 11110000 240-254 242.5.7.0 1
Class A addresses contain 7 bits in the network portion giving 27 - 2 = 126 possible networks since all 1's and all 0's are not allowed. Consequently 24 bits remain for the host portion allowing a total of 224 - 2 = 16,777,214 hosts. 127.0.0.0/8 is reserved for loopback address purposes where just 127.0.0.1 is used normally. The address 255.255.255.255 is used as broadcast addresses and 0.0.0.0 as a default route address, meaning any network. The address 0.0.0.0 is sometimes used by hosts that have yet to receive an IP address e.g. a DHCP Client awaiting an address from the DHCP server.

Class B addresses contain 14 bits in the network portion allowing 214 - 2 = 16,384 possible networks, and 16 bits for the host portion allowing a possible total number of 216 - 2 = 65,534 hosts.

Class C addresses contain 21 bits for the network portion giving a possible total of 221 - 2 = 2,097,152 networks, and 8 bits for the host portion giving a possible 28 - 2 = 254 hosts.

Class D addresses are used for multicasting and Class E addresses are used in research.

Historically, a company may have been allocated just one Class A, B or C IP address by the Network Information Centre (NIC). Currently, all Class A addresses have been allocated and most if not all of the Class B addresses have gone. If a company have a number of networks to manage then the network administrator may wish to subnet his network, that is create subnet addresses within the scope of the IP address that the administrator has been given.

Subnets


Subnetting Example


A customer has been given an IP address of 128.100.0.0 (a Class B address) for his company. He has specified that he requires 3 separate networks with the maximum possible number of host connections on each network.

The first two octets 128.100 are fixed since these are given by NIC as the Class B address, therefore we have the last two octets to play with. Let us examine the possibilities more closely:
  1. The address given
    Octet 1            Octet 2         Octet 3         Octet 4 10000000
  2.  01100100        00000000        00000000 128.
  3.  100.            0.              0 
  1. We need to create a minimum of 3 different subnets but not at the expense of the number of host addresses available to us. The following process would seem to give us 4 permutations of subnets:
    Looking at octet 3 specifically in binary, let us just use the first 2 bits for a subnet address:
    128 64 32 16 8 4 2 1 1
  2. 1 0 0 0 0 0 0 
    The possible combinations for the first two bits are:
    11 = 192 -> 128.100.192.0 10 = 128
  3. -> 128.100.128.0 01 = 64 -> 128.100.64.0 00 = 0
  4. -> 128.100.0.0 
    However all 1's and all 0's used to be not allowed for a subnet. These subnets are called the All One's Subnet and Subnet Zero. The reason for this was that older software found it difficult to distinguish between networks 128.100.0.0/16 and the all-zeros subnet 128.100.0.0/18. The same was true of the all-ones subnet. RFC 950 therefore rules out '11' and '00' as useable subnets, we are therefore left with only two subnet addresses instead of the 3 we require.
  1. Let us try and use an extra bit in octet 3:
    128 64 32 16 8 4 2 1 1
  2. 1 1 0 0 0 0 0 
    The possible combinations are now:
    111 = 224 -> 128.100.224.0 110 = 192
  3. -> 128.100.192.0 101 = 160
  4. -> 128.100.160.0 011 = 96
  5. -> 128.100.96.0 001 = 32
  6. -> 128.100.32.0 010 = 64
  7. -> 128.100.64.0 100 = 128
  8. -> 128.100.128.0 000 = 0
  9. -> 128.100.0.0 
    As before all 1's and all 0's are not permitted for subnets, therefore we are left with 6 possible subnets (23 - 2):-
    128.100.32.0 128.100.64.0 128.100.96.0 128.100.128.0 128.100.160.0 128.100.192.0 
  1. This leaves the rest of the bits (from power 16 downwards) in octet 3 and all the bits in octet 4 to construct the individual host addresses, the permutations amount to many thousands of hosts which should be plenty. Below is an example of a host address in subnet 128.100.192.0:-
    128.100.194.23  
    On first inspection it would appear that address 128.100.194.23 has nothing to do with the subnet 128.100.192.0, so let us look a little more closely at the final two octets of the host address:
    Octet 3 = 194                            Octet 4 = 23 128  64   32   16   8   4   2   1
  2.  128  64   32   16   8   4   2   1 1    1    0    0    0   0   1   0
  3.  0    0    0    1    0   1   1   1 
    As we can see we are indeed part of the 128.100.192.0 subnet since it is only the first three bits of octet 3 which are used for the subnet address. All the bits from power 16 and downwards are allocated to the host address, so the power 2 bit just turns octet 3 from decimal 192 to decimal 194. Confusion frequently arises in this situation where the dividing line between the network portion of the IP address and the host portion rests part way through an octet (in this case between power 32 and power 16 of octet 3). Often it is possible to make the network/host dividing line between octets so that you can easily tell which host address belongs to which subnet.

    Routers are used to minimise unnecessary traffic, and when running IP it is important to tell it which subnet an address is supposed to go. The way this is done, is at configuration by entering a 'subnet mask'.
The situation with the All-zeros and All-ones subnets nowadays is to allow them according to RFC 1878. This is because modern applications understand how to distinguish between these subnets and the main network.

Subnet masks
The subnet mask specifies the portion of the IP address that is going to be used for subnetworks (as opposed to hosts). For every bit position in the IP address that is part of the network ID or subnetwork ID, a '1' is set, and for every bit position in the IP address that is part of the host id portion, a '0' is set. The router uses the boolean AND operation with an incoming IP address to 'lose' the host portion of the IP address i.e. the bits that are '0', and match the network portion with its routing table. From this, the router can determine out of which interface to send the datagram. This means that the 'Don't care bits' are represented by binary 0's whilst the 'Do care bits' are represented by binary 1's.

For our example above, because we used the first three bits in octet 3 for our subnet addressing the subnet mask would be:
Octet 1  Octet 2  Octet 3  Octet 4 11111111 11111111 
11100000 00000000 255. 255. 224. 0
What is important is that the same mask is applied throughout the physical networks that share the same subnet part of the IP address. All devices connected to the networks that compose the subnet must have the same mask.

A Broadcast Address for a subnet is when all 1's are used in the host portion of the IP address. For example, for the IP address 10.17.20.4 and a mask of 255.255.255.0 the subnet is 10.17.20.0 and the host id is 4. The broadcast address within the 10.17.20.0 subnet is when the host id portion of the address is made up of all binary 1's. In this example the host portion is the last octet and if these 8 bits are set to 1 we have a broadcast address of 10.17.20.255. You can ping this, send messages to this and so on, a single line to server a multitude of end stations.

Often you will see the network mask represented as a number of bits e.g. for the above example address of 10.17.20.4 with a mask of 255.255.255.0, this can also be represented as 10.17.20.4/24, where the 24 represents 24 bits (3 octets) set to 1.

Another Subnetting Example


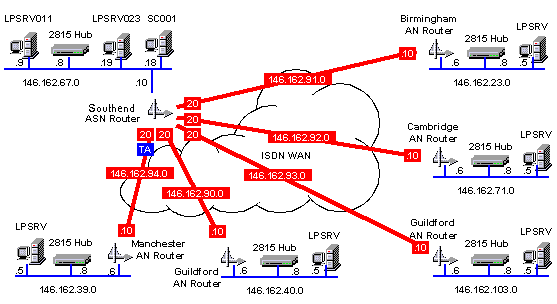
Study the schematic below:

Subnets

The network drawing above shows the IP address map for a WAN installation carried out for a large financial institution. The customer had installed 'Windows NT' servers at a number of sites and was requiring an ISDN link, star-wired out, from each of the sites from the main office server room. The IP addressing scheme had to take into account the following factors:-
  • Up to 30 more sites may be added to the WAN in the near future.
  • Each site could have up to 50 host connections.
  • The customer had already assigned IP addresses to some of the servers and site PC's on the local LAN's.
The IP address given to this company was 146.162.0.0 (which is a Class B address), and the decision was made to use the whole of octet 3 for the subnet addresses leaving octet 4 for the host addresses. This made assigning IP addresses more easy to carry out and gave a maximum of 254 hosts per subnet and there could be a maximum of 254 subnets, thus satisfying the customer's requirements. The subnet mask for each subnet (Whether LAN or WAN) was consequently 255.255.255.0, it is important to design the addressing scheme such that the subnet mask is common to all LAN's/WAN's throughout the network unless a routing protocol such as OSPF is to be used. OSPF allows variable subnet masking.

Whilst studying the schematic you will note that the WAN links are 146.162.90.0 to 146.162.94.0 and the router ISDN interfaces are .20 at the main office end and .10 at the remote office end. Also you will note that the server IP addresses are all .5 and the ethernet hubs are all .8 while the router ethernet interfaces are all .6. Organising addressing like this can make life much easier especially when you are hopping from site to site.

RFC 950 and RFC 1812 describes IP subnetting whereas RFC 1009 defines Variable Length Subnet Masking.

Quick tricks to find subnets and broadcast addresses


If you have a subnet mask, then it is possible to quickly list out the possible subnets and broadcast addresses.

The number by which subnets increment for a given mask is calculated by subtracting the last numbered octet in decimal from 256. For example, given the subnet 10.1.0.0 255.255.248.0, the last numbered octet is 248, therefore 256 - 248 = 8, so subnets jump up in 8's i.e. 10.1.8.0, 10.1.16.0, 10.1.24.0 etc.

Once you have found out by how much subnets jump, finding a broadcast address for each subnet is quickly done by subtracting 1 from this and adding this to each subnet. Using the above example, for subnet 10.1.8.0, the subnets jump in 8's, 8 - 1 = 7 and 8 + 7 = 15 so, taking it as given that the final octet will be all one's for the broadcast, the broadcast address is 10.1.15.255.

Wildcard Masks


You will often come across Wildcard masks, particularly if you work with OSPF and/or Cisco routers. The use of wildcard masks is most prevalent when building Access Control Lists (ACLs) on Cisco routers. ACLs are filters and make use of wildcard masks to define the scope of the address filter. Although ACL wildcard masks are used with other protocols, we will concentrate on IP here.

Let us first take a simple example. We may want to filter a sub-network 10.1.1.0 which has a Class C mask (24-bit) 255.255.255.0. The ACL will require the scope of the addresses to be defined by a wildcard mask which, in this example is 0.0.0.255. This means that the 'Don't care bits' are represented by binary 1's whilst the 'Do care bits' are represented by binary 0's. You will note that this is the exact opposite to subnet masks!

Taking a more complex example. Say we wish to filter out a subnet which is given by 10.1.1.32 having a mask of 255.255.255.224 i.e. 10.1.1.32/27. How do we find the wildcard mask for this? Well to help us, concentrating on the 4th octet, let us first look at the binary for this network and subnet mask. Then we reverse the binary bits to get the wildcard bits and then convert back to decimal to obtain the wildcard mask for the 4th octet:

4th octet in decimal 32
4th octet in binary 0 0 1 0 0 0 0 0
4th octet mask in decimal 224
4th octet mask in binary 1 1 1 0 0 0 0 0
Now the 4th octet wildcard in binary 0 0 0 1 1 1 1 1
Now the 4th octet wildcard in decimal 31

The important bits have been highlighted in bold and this shows that the wildcard mask for the network 10.1.1.32/27 is 0.0.0.31.

The following table should help in seeing a pattern between the number of bits used for the mask in a particular octet, the subnet mask in decimal and the equivalent wildcard mask:

No. of Network Bits Set to 1 0 1 2 3 4 5 6 7 8
Subnet Mask Binary 00000000 10000000 11000000 11100000 11110000 11111000 11111100 11111110 11111111
Subnet Mask Decimal 0 128 192 224 240 248 252 254 255
Wildcard Mask Binary 11111111 01111111 00111111 00011111 00001111 00000111 00000011 00000001 00000000
Wildcard Mask 255 127 63 31 15 7 3 1 0

The binary for the wildcard mask is the exact reverse, bit for bit, of the subnet mask. You then calculate the decimal from the reversed binary bits to obtain the dotted decimal wildcard mask.

Private Addresses


One of the ways to combat the fast reduction in available IP address space was to introduce the concept of private addresses and the use of Network Address Translator (NAT) to allow many organisations to use the same address space but not have this space visible on the Internet i.e. to use address translation on the edge of the networks.

The Class A network address range 10.0.0.0 to 10.255.255.255 (10.0.0.0/8) is designated for private use only. This address range cannot be used on the Internet as every ISP will automatically drop the address. This address is becoming very popular as its use in conjunction with Network Address Translation (NAT) has meant that large corporations can make use of the Class A address space available within 10.0.0.0 for their own private use internally and just use NAT for those relatively few addresses that do need to operate on the Internet. This is one reason why the immediate need for IP version 6 has been diminished.

There is also the private address range 172.16.0.0 to 172.31.255.255 (172.16.0.0/12) which is the CIDR block of 16 x Class B addresses 172.16.0.0, 172.17.0.0, .... ,172.31.0.0.

The network address range 192.168.0.0 to 192.168.255.255 (192.168.0.0/16) is also for private use and is a CIDR block of 256 x Class C addresses 192.168.0.0, 192.168.1.0, .... ,192.168.255.0.

Examine RFC 1918 for more information on address allocation for private networks.

Other Special addresses


The address range 0.0.0.0/8 is currently considered throughout the Internet as for special use. Note that this is different from the host address 0.0.0.0/32 which means 'default'. You can have legitimate addresses in the range 0.0.0.0/16, e.g. 0.0.123.95/16.

The address range 192.0.2.0/24 is called the Test Net and is reserved for use in testing examples and documentation.

The address range 169.254.0.0/16 is used for auto-configuration of IP addresses if a DHCP server should fail and there is no backup for the DHCP Clients. This is described in RFC 2563 Stateless Auto-configuration.

Directed Broadcasts


The RFC 1812 overviews the requirements of routers to run IPv4. One of the requirements is that routers MUST, by default accept Directed Broadcasts (although it is allowable to have a switch that turns this off). A directed broadcast is one where the IP broadcast has been sent to a destination prefix (a net or subnet). A directed broadcast destined for the network 10.20.20.0/24 would be 10.20.20.255, for example.